Introduction
For this article, we used:
The Flag module
Flag is a generic module lets you create types of flags that users can use to flag things. You can think of flags as labels that you can use to label things.
You can flag content (nodes), media, users, files, custom blocks, ... in other words: you can flag anything that is a content entity.
Typical flag types site builders create include: bookmark, like, dislike, star, and mark as inappropriate.
Article scope
At TrainingCloud, our learners typically have access to a large number of materials. We wanted to give them easy way to bookmark content so they have the most useful information readily available.
In this article we'll demonstrate step by step:
- how to set up a bookmark flag
- how to let users bookmark content
- how to build a views-based block that shows who bookmarked a given piece of content
- how to build a views-based page that shows the current user's bookmarks
Step 1 - install modules
The only module you really need for this scenario is the Flag module.
That said, the Devel module is a useful tool to quickly generate dummy content to use when testing functionality like views and reference fields. You don't have to use it, but it's a time saver.
composer require drupal/flag:^4.0@beta
composer require drupal/devel
drush en flag devel devel_generate
Step 2: Create a bookmark flag type
Via Admin > Structure > Flag, create a new type of flag named "bookmark":
- Flag type: content
- Flag name: bookmark
Edit your new flag type:
- Flag link text: Bookmark this
- Unflag link text: Remove this bookmark
- Flaggable type: select Article
That's it. You don't need to do anything more to make articles flaggable.
A bookmark link should now appear on all Articles.
Step 3 - Generate content
At this point, you should create some dummy content, either manually or using the Devel module and its Devel Generate submodule.
Either way, you'll need to bookmark a few articles now, before moving on to the next step, learning how Flag integrates with Views.
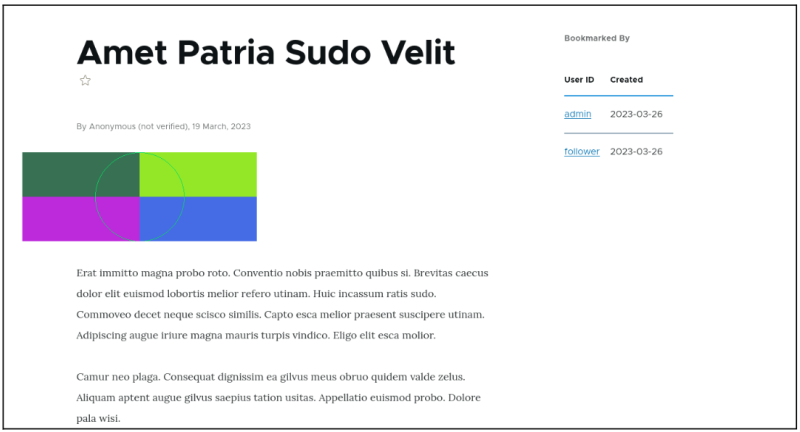
Step 4 - Create "Bookmarked By" Block
This example block is meant to be placed on Article pages, and shows who (else) bookmarked the article.
Create a new view:
- Name: Bookmarked by
- Show: flagging
- Display type: block
Add a contextual filter
The end goal is a list of users who have bookmarked the current article.
Our approach is to build a list of flaggings, but only the flaggings for article on whose page the block appears, and only flaggings of the type bookmark.
Once we have that list, we'll want to show the username of the creator (owner) of each flagging.
In the view's Advanced settings, add a new contxtual filter:
- Select Entity id
- "When the filter value is NOT available": provide a default value of the type content ID from URL
This configuration translates to:
Only show flaggings for content whose node id matches the node found in the URL of the content that is currently shown.
Even if your article has an alias like /blog/hello-world Drupal is clever enough to figure out its underlying node id (/node/123) and use that as the filter value.*
Once we have the correct flaggings - the ones that correspond to the current node - we select the flagging's author id and creation date as the fields we want to show.
Fields
Add the following fields:
- User ID (flagging):
- Formatter: Label
- Created (flagging):
- Date format: whichever you prefer
Done!
Your block should look like this:
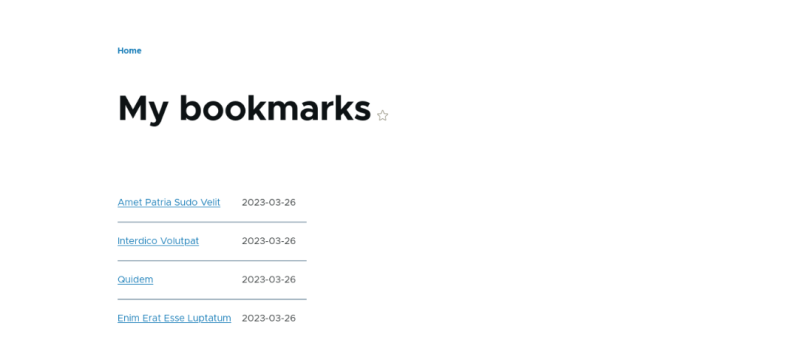
Step 5 - Create "My Bookmarks" Page
The goal of this Views-based page is to show the current user a list of their bookmarks at /my-bookmarks.
Create a new view:
- Name: My bookmarks
- Show: Articles
- Display type: page
Add a relationship to Flag
- Relationship: Content flag (Flag)
- Relationship settings:
- Flag: Bookmark
- By: Current user
By adding this relationship and these settings, you're automatically filtering on flag type ("Bookmark"), and only showing flaggings created by the current user.
You now also have access to other flagging-related fields, including its creation date.
Add fields
- Title (Content)
- Created (Flagging)
Done!
Here's what the result should look like:
Conclusion
The Flag module is straightforward to set up and use, and integrates well with Views. It's clear why Flag is the go-to module for many types of bookmark-like interactions, such as liking, upvoting, and starring.
Summary
- Install Flag for all kinds of bookmarking functionality.
- Usage
- Create flag type
- Specify which type of entity / content it can flag
- Optionally create page/block views of flaggings